
Scroll down to read my newest reviews and ramblings. Visit “The List” to read about what’s on my wish list. Follow us on Instagram, Facebook, and YouTube!

Pure Blue Japan x Blue Owl Workshop PBO-001: The Beginning
My go-to pair of pants for the past year and a half have been my Momotaro 0305TNs. They were my first nice pair of denim, and lived through all the seasons, different countries, many washes, and repairs. They are, by no means, retired, but it was time to add to the family.


I purchased my pair of Momotaros at Blue Owl Workshop and had a very pleasant experience. Needless to say, when I was looking for my next pair, they were my first stop. I looked through their selection, and had my eyes on the PBO-001, an 18oz unsanforized Black/Indigo pair made by Pure Blue Japan.

As described by BOW in “The Mill“:
The inaugural installment in the Pure Blue Japan x Blue Owl Workshop collaboration series pushes the boundaries of Pure Blue Japan’s extensive denim catalog. Built using Pure Blue Japan’s critically acclaimed 18oz unsanforized denim, the jeans have undergone a unique multi-layer dye process in which the indigo warp yarn is over-dyed in black pigment. With wear, the jeans will show a varied three-layered fade going from black to blue to white, while highlighting the fabric’s incredible slub texture and grain.
These are also a contest pair, which runs until January 1st, 2019.

Jay Doughten, managing director at BOW, was very prompt and helpful with sizing, and within 3 days of purchasing, I had, in my hands, my new pair. Upon receipt, I was very excited by what I had in my hands.
https://www.instagram.com/p/Be6t5sIDvqY
They are definitely very unique. My Momotaros were unique in the details, such as the selvege, pockets, and threads, but this pair is unique in the very fabric it is made of.

That being said, these PBJs are no slouch by any means. The blue selvedge line sticks out against the black dye and the Blue Owl logo is a nice touch on the back pocket. I hope that the white thread in the owl doesn’t discolor with wear, although I do suspect that it will. The deerskin patch is very soft to the touch.

Maker:S,Date:2017-8-6,Ver:6,Lens:Kan03,Act:Lar02,E-Y

Maker:S,Date:2017-8-6,Ver:6,Lens:Kan03,Act:Lar02,E-Y

Maker:S,Date:2017-8-6,Ver:6,Lens:Kan03,Act:Lar02,E-Y

Maker:S,Date:2017-8-6,Ver:6,Lens:Kan03,Act:Lar02,E-Y

Maker:S,Date:2017-8-6,Ver:6,Lens:Kan03,Act:Lar02,E-Y
Being my first unsanforized pair, I was a bit taken aback when I felt denim. It’s slubby and rough, and definitely very thick. Slipping them on before soaking, they were way too large. I didn’t get them hemmed, even though BOW offers free hemming, for I wanted to do the soak myself and cuff my jeans.

I had trust in Jay with sizing, though, and marched forward for the soak. I decided, for fitting purchases, to wear the denim for a bit while they soaked. As such, I had to use lukewarm water instead of cold water for the first 20 minutes, before switching over to cold water.

Maker:S,Date:2017-8-6,Ver:6,Lens:Kan03,Act:Lar02,E-ve

Maker:S,Date:2017-8-6,Ver:6,Lens:Kan03,Act:Lar02,E-ve
I let them hang, and watched the indigo drip. They are overdyed, so a bit of indigo loss won’t be the end of the world.
Wearing them for the first time the day after, the button fly still a bit damp, they fitted a tad snug. I am anticipating there to be some stretching over time, though hopefully not too much. Some knee bags formed on the first day, but as a student, I sit and bend my knees a lot, so it was going to happen sooner or later.
And, so it begins. I will be documenting this pair on a new Instagram Account: @frozen_pbjbow. Be sure to follow for daily updates!

First year: Momotaro 0305TN 10th Anniversary Selvedge Denim
Introduction
It’s been a long ways coming for me to make my way into the big boy leagues of fine Japanese denim. I’ve always loved the white stripes on Momotaro’s “Going to Battle” line. Luckily, I procrastinated on my purchase for the 10th anniversary edition to come out, which have the white stripes as well as many other notable features. It’s been more than a year since I first got them. They’ve been all over the world, been worn more days than not, in weather on all spectrums. They’ve been through a repair, and will be needing another one soon, so it seemed appropriate to do a small write-up on how they’ve fared so far.
Specs
Sizing: Check out Blue Owl’s Size Guide here
Place of Manufacture: Japan
Cost: 315USD
The Brand
Momotaro is a denim company based in Kojima, Japan. Founded in 2005, Momotaro began by producing replicas of vintage American denim. Their name is from the legend of Momotaro, a young boy born from a giant peach who then descended to earth to become the son of an elderly couple. The pink inseam pays homage to this story
Their company has different labels including “Copper Label”, “Vintage Label”, “Battle Label”, and “Gold Label”, each with their own special taste. This pair is part of the “Battle Label”, with the white stripes on the back pocket symbolizing honor and strength, as per Japanese tradition.
Ordering

While the Momotaro’s 10th Anniversary series is available through various retailers, the “Tight Tapered” cut is only available in the United States (to my knowledge). On Rakuten and Denimio, Tight and Regular cuts are available. I wanted the “Tight Tapered” cut, so I purchased my pair through Blue Owl Workshop, a retailer based in Seattle, Washington.
I had a bit of difficulty determining my size, so I sent them an email. I promptly received a reply from Jay Doughten, who is the owner of Blue Owl Workshop. He was very helpful in going through my choices and was very informative. Shipping is free for orders over $100, and you get BOW rewards for every $100 that you spend.
They are sold out at BOW now, but they can still be found at some other retailers.
First Few Wears
My first time putting on these jeans was not the most pleasant. They were very tight and I had trouble buttoning them all the way up without exhaling all the way. There was a bit of tension in the groin area, which made walking with a normal stride a bit difficult. I sent Jay an email, during which he ensured that they’d be okay (he also gave me the option of sending them back.


Within a few hours, my waist was feeling much better, and by the second day, they felt like a normal pair of denim. It is worth noting that they did not stretch out too much after the first week.
Details

The patch is made of cowhide and has gold foil accents. Overtime, I have lost some of the threading, there is a small black stain near the top of the patch, yet most of the foiling remains. It has gotten a bit darker with wear, probably due to moisture.
Rivets made of brass. The rivets on the back pockets are hidden while others are exposed. They have nice detailing on them and, for the most part, are still quite shiny.
The button fly is very interesting. Every variation of Momotaro buttons were used in the fly, with the top button being a plain button. You can see the wear markings on the right sides of the buttons due to buttoning and unbuttoning the fly.

As with all Momotaro jeans, the inseam uses pink thread, paying homage to the peach that Momotaro was born out of. It makes the pair stand out quite a bit and contrasts nicely with the indigo.

Maker:S,Date:2017-8-6,Ver:6,Lens:Kan03,Act:Lar02,E-Y

Maker:S,Date:2017-8-6,Ver:6,Lens:Kan03,Act:Lar02,E-Y
The pocket bags are interesting, with one left pocket bag being in Japanese and the English translation on the right pocket. Some holes have started appearing in the pockets, but I will try my best to patch them up and preserve them.
They were featured on Heddels’ Fade of the Day on September 23, 2017.
Extras
[pictures coming]
As part of the 10th Anniversary package, there is also a canvas bag and a rope-dyed bandana. I cold soaked the bandana before I started carrying it for fear that it would bleed. I have had no issues with it.
The bag is made well and looks great. It is embroidered with “Momotaro” across the front. They used the same material for the pockets. I will probably cannibalize the back half of the bag for pocket patching material.
Repairs
As noted before, this pair of denim has been out for repair once. At the time of repair (ca summer 2017), the knees were wearing thin, a crotch blowout was imminent, and the many threads were coming undone.


I sent them out to Indigo Proof, run by Rain Delisle, in Portland, Oregon. she did a multitude of repairs, notably reinforcing the knees, crotch, cuffs, and back pocket region.
https://www.instagram.com/p/BX8ufjOF8mc
The repairs look great i.e. they are not obvious at all. You have to look closely to notice that there are repairs. On the other hand, they also feel great.
Conclusion
I have to send them out to Rain, again, but I see a long life ahead of these guys. I am currently fading my PBJ-001’s from Blue Owl Workshop, so they’ll have some time to rest and refit. After the PBJxBOW contest is over, they’ll be mixed back into the rotation. Until then, they’ll probably just be worn when the PBJs are being washed.


Custom 60% Keyboard Build
Introduction
I’ve wanted a mechanical keyboard for a long time, but I could never find a key layout that I liked. After experimenting with making some macro buttons, I decided to make my own keyboard. This is what happened.
Design
The reason for designing this keyboard is because I wanted a tenkeyless keyboard with the arrow keys that was still around the 60-61% size.
With that in mind, I based my keyboard off of the keyboard on the Dell XPS 15 9550 and the newer Thinkpad T-series. The right shift key was completely removed in order to accommodate full-size arrow keys and keys on each side of the up-arrow were added, similar to Thinkpad keyboards. The space bar was extended to the standard 7u and, as such, the right alt and ctr keys were also removed.

As with most 60% keyboards, the function keys are not there and, as such, they are accessed via “fn+top row”.
Because the right shift key is removed, it becomes difficult to do the key combination “shift+delete” with one hand. As such, the function key is utilized to enable the key combination to be done with one hand on the left side.
I designed the layout of the keyboard using Keyboard Layout Editor. This web application makes it easy to save and modify your designs. You can access my design here.
Designing and Ordering the Plate
My plate was manufactured by Lasergist. The easiest way to get this done is by inputting your raw data from Keyboard Layout Editor into Swillkb, which will generate a plate for you and automatically send the file to LaserGist.
I used decided to use 8 mount holes (4 on the top and bottom edges) sized for M2 screws. I also rounded the corners for aesthetic purposes.

Swillkb will generate a DXF, SVG, or EPS file. You can send this file to any company to manufacture, although you may need to change the Kerf depending on the company’s specifications.

I chose the thickness to be 1.5mm, in order for the switches to snap into the plate. All in all, my plate cost $50.29 including shipping.
Other Parts
For this build, I am using:
63 x Cherry MX Blue Switches
3 x 2u Costar MX Stabilizer
1 x 7u Costar MX Stabilizer
1 x USB Type B Port
1 x Teensy 2.0
1 x USB cable I happened to have
1 x PBT 87 Blank White Key Caps from Banggood (link, not referral)
I chose the Cherry MX Blue Switch (product code: MX1A-E1xx) as I plan on using the keyboard primarily for typing. I was attracted to the tactile bump and the audible click, as well as the higher actuation force. However, this makes it less suitable for public work environments. When I build another keyboard, I will probably choose to use MX Brown switches, to make it more public-area-friendly.
The Teensy 2.0 was chosen as there is plenty of firmware available for it. More detail on this below in the “programming section”.
As I will be making my own keycaps soon, I chose the cheapest set of blank keycaps I could find, which were a set of 87 blank keycaps from Banggood. They are very highly rated and are aggressively priced. One of the keycaps arrived broken. I sent Banggood a message, but never received a response.
The total cost for the electronic parts was $75.36 from Mouser. The USB cable was $10 and the keycaps were $17.69.
The Build
For the build, I referred to BrownFox’s guide on deskauthority (found here). I found that it is more efficient to bend the transistors first. It also makes sure they all look uniform.


For the cross wires, I used pre-cut and stripped wires for uniformity, with the exception of the spacebar switch, which required a length that was in between the sizes I had on hand.

From this bottom view picture, you can see that I did not do a good job of connecting the rows and columns to my Teensy. Doing this again, I would have taken extra special care in planning this step out. As with most, I would position the Teensy under the space bar (potential drilling holes to mount it in place) and cut wires to ensure clutter-free, clean wiring.
Programming
To program the keyboard, I first explored using Hasu’s TMK firmware (free on github: here). The nice part about using TMK is that it comes with many pre-programmed layouts. Modifying a layout to fit your own custom design is also very easy. I used WinAVR to do the modifying. This requires writing in the rows and columns in your keyboard matrix and then mapping the keys functions to each key. For a very comprehensive guide on programming, check out matt3o’s guide: here.
However, I eventually came across EasyAVR which is… easy. The geekhack page (found: here) is detailed and explains everything that you need to do to create a layout. Modifying the source code is the most time consuming part. However, after that is done, the GUI makes it easy to map keys. I like how it is visual, so you can see how what your key map looks like.

I can share my firmware with anyone who wants it (email me for now until I upload it somewhere). I would highly suggest going through the process yourself. It is very satisfying and, even for an amateur like me, only took about an hour to do.

To flash the firmware to the Teensy, I used Teensy Loader. Quick and painless.
Case
I wanted a case that I would be proud of showing off. As such, I decided to build a wooden case myself. I chose to use 1/2″ Cherry planks for the sides and 1/4″ Cherry for the bottom. The 1/2″ planks provide enough space to screw the plate into the sides securely.
I used traditional cabinet making techniques to put the wood together. Well, I tried. This is what I ended up with a pile of wood.

That being said, I learned a lot about woodworking and made some mistakes that I definitely will not be making again.

I figured that I had wasted enough money and I really wanted to get typing, so I used the M2 screws and brass standoffs that I had purchased as a makeshift case. While the screws sometimes become a little loose, it honestly works pretty well for something so “jank”. I feel very little flex and the keyboard sits at a comfortable angle for typing.

However, I found this to be very unstable and, over time, the screws would unloosen and the entire keyboard would wobble. Furthermore, I experienced quite a bit of keyboard flex, even with the metal plate.

As such, I resorted to one of my most hated machines: the laser cutter. Using the files outputted by Swillkb, I was able to instantly cut out the pieces. I made the mid-layers out of cherry and the bottom layer out of acrylic. I did experience some issues with the holes being a bit off center on the acrylic layer (due to warping from the heat, I presume), but it is not noticeable. The wood was scorched by the laser cutter. Doing this again, I would cut it slightly large, then sand it to size.

As such, the back is transparent, showing off the internal components, just like the exhibition back of a watch.
Finished Product

It has its flaws: I never added a USB port to allow the cable to be detached, the soldering is a bit shoddy, and the case is scorched. It’s been a journey though and has taught me many good lessons to help me make a second, third, and many more custom boards.
Please leave a comment or send me an email if you have any questions.

Montblanc 149 Review
Introduction
Montblanc, along with Parker and Waterman, seems to be one of those fountain pen brands that even non-enthusiasts seem to know. Their pens can sometimes be quite gaudy, although their Meisterstück line has a certain classic feel to them. The Meisterstück 149 is the largest and most expensive pen in their non-limited edition model lineup. Does it stand up to the price it takes to own
The pens I will be reviewing today were purchased from a local seller and were manufactured in the 1980s. The pens are near identical except for the nibs.
Specs
Length: 14.7cm
Diameter: 14.8mm
Weight: 29g
Place of manufacture: Germany
Price: $935 (retail), $650-800 (street)
Design
The Montblanc 149 has been produced since the late 1940s. Since the beginning, it has featured the classic cigar shape, a piston filler, and a big number 9 nib.
The barrel was initially made of celluloid, although, they later switched to a material they call “precious resin”, essentially a hard, secretly formulated plastic. The material does not scratch easily, although the scratches that do exist are quite obvious in contrast to the high polish surface.

The barrel is made from a single piece. Later varieties are made from two pieces. There is an ink window near the grip section. It is slightly tinted, with vertical stripes. The threads for the cap are cut at the height of the barrel.

In contrast to the black body, there is plenty of gold trim. On the cap, there is a band with the words “…”. The engraving (or perhaps stamping) The clip has the place of manufacture “GERMANY” stamped in it. On later models, a serial number was also added. The number can be helpful in dating a pen.

The nib material has also changed over the years, switching from 18 karat to 14 karat and then back to 18 karat gold, with different styles of plating over the years, ranging from dual tone to triple tone.

The feed is made from ebonite. Fins are cut on both sides, with a solid spine down the middle. This is the “split feed” variety . Later feeds were made from plastic.

The two stage piston was originally made of brass (the threads) and plastic, although in recent years, the entire assembly is now from plastic. The first few turns of the knob does not move the piston. This is to prevent one from accidentally discharging ink. Following the first few turns, the piston begins to go down. The reservoir has a very large capacity of 2ml.

A very nice timeline was created by “DKbRS” on The Fountain Pen Network. The thread can be found here. I used the guide to help me date my pens.
Fit and Finish

As with most Montblancs, the fit and finish of the pen is mostly near perfect. The nibs are hand-finished and it shows. The tines are not perfectly centered (although as I’ll mention later, this does not affect functionality in the least). The engravings are also nicely done, although they are not perfectly symmetrical.
The piston is very smooth. The tension twisting the knob is very smooth at every stage. When the knob is in its closed position, there is no gap between the knob and the body. When the piston is fully extended, there is a bit of give, which immediately springs back when you let go. I assume this is a indicator that the piston is fully extended and to help prevent accidentally snapping the piston.

The cap fits very well on the body. The threads fit very tightly, with no movement between the cap and body when closed. The engraving on the gold band around the cap is done very nicely and is consistent between pens.
Functionality

Filling the pen is very easy with the piston filler. A plunge or two fills most, if not all of the reservoir. Flushing out ink, however, can be quite time-consuming. The large feed accommodating the large nib has the unfortunate ability of retaining ink remnants. Soaking the entire pen in water seems to help with the process, though.

The pen is a joy to write with. With such a large pen, the grip section is very comfortable and is at a nice balance point for the pen when un-posted. Due to its large size, the pen is probably best used un-posted. That being said, one probably wouldn’t want to risk scratching the pen by posting the pen anyways. There are some posting marks on the barrel of one of the pens. Not very deep, but noticeable to a careful eye.

The nib is surprisingly flexible and the pen is able to produce a multitude of line variations. The feed keeps up no matter how wide the tines are spread.
Flexing the nib does require more force than vintage pens. Although the pen is pre-owned, I don’t believe the pen was used much. Even so, the nib is tuned to be very smooth from the factory.


The clip is springy and holds a pen firm in a shirt pocket. It does not stretch much, though, and would not comfortably clip into a jean pocket without permanently bending out of shape.
Value
The pen retails for $935, making it the most expensive pen from Montblanc’s regular lineup. That being said, I would have a hard time justifying buying the pen retail. Luckily, the pen is commonly found, new, from different retailers for a few hundred lower. Pre-owned, the pen can be found for $3-500, depending on the year that it is manufactured and the condition.
For me, the bottom line is that the pen is a manufactured, plastic-bodied pen. While there is some value in the nib, which is made in house, and the fact that it is hand-tuned, one could get a similar feeling from a pen made by on of Japan’s big three for much less.
Conclusion
All this being said, the Montblanc 149 is a very nice pen, with a very ugly price tag. Sure, it is big, gorgeous, and carries the allure of a brand like Montblanc. However, I would expect so much more from a pen at the price range. Therefore, these pens will soon no longer be in possession.

Midori MD Pencil Review
Introduction
Midori is very famous for their Traveler’s Notebooks and their brass products. While they have produced pencils in the past, for their brass pencil extenders, the Midori MD pencil is their first full size pencil. The MD line (which I believe stands for Midori Diary) is known for its simplistic design and light colors. Does Midori pull through with their first full-length woodcased pencil?
Specs
Shape: Hexagonal
Length: 176mm
Diameter: 7mm
Weight: 5g
Place of Manufacture: Japan
Design

The pencils come in a pack of six within a slim plastic package. There is a small label in the packaging, similar to those included with other Midori MD products. As always, there is nothing gaudy about the packaging.


The writing on the label is playful and is meant to mimic handwriting. Luckily, it is not hard to read. The back of the label only has a barcode and some recycling information.
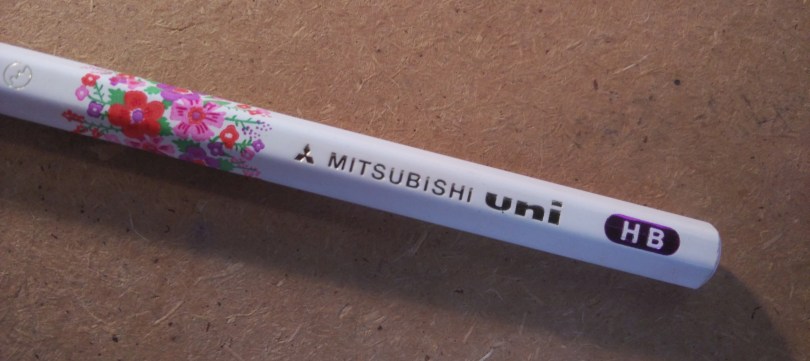
The pencil itself is very simplistic. The barrel is hexagonal and is a light cream color. The paint is matte and does not reflect any light. While it is smooth, you can definitely “feel” the pencil between your fingers. There is no ferrule.

There is black lettering on one side of the pencil with the words “Midori MD” as well as “B” to indicate the hardness. There is no other writing or imprinting on the pencil.
Fit and Finish


The pencils feel solidly made, although the paint is not the best. It appears as though the paint rubs off easily, as seen in the above pictures.
The lettering is pretty good, although not that sharp on the edges. This might have been done on purpose as part of the font, but it looks a bit sloppy.


The two halves of the barrel are matched well and the core is well centered. However, the paint around the edges came chipped. It is not apparent whether this happened during manufacturing or during packing.
Functionality

Sharpening the pencil in my Carl Angel-5 was very smooth and easy. As expected, the pencil left some bite marks in the barrel. It did not expose bare wood, but, instead, the marks were paint filled.

The point was moderately long and well rounded. The barrel did not split upon sharpening. There was no excess shavings hanging on after sharpening.

The core is a tad harder than most Japanese pencils of hardness “B”, writing closer to a Mitsubishi Hi-Uni “HB”. The writing experience was “all right” at best. It is better than your run-of-the-mill dollar store pencil, but, at least for me, the amount of feedback the core was giving me was somewhat unpleasant.
However, a few days later, I was curious enough to pick it back up and give it another go. During my second attempt at using it, I found it to be better than I first thought, and definitely usable, although it will not be winning any awards in my book.
I will note that my opinion on the tactile feedback that the pencil gives is just my take on it. I am sure some will appreciate it.

That being said, though, I do like how dark of a line the pencil puts down. Furthermore, it erases easily and point retention is pretty good.
Conclusion
I am a bit disappointed by these pencils. The quality was not as good as I was expecting and the writing experience was not not up to par in comparison to Midori’s paper offerings (in my opinion). Aesthetically, once you get over the dirtied surfaces, the pencil is elegantly simple and is comparable to the Mitsubishi White Pencil in looks.
I probably won’t be picking any more of these up in the future. I’m still on edge about whether I’ll keep the ones that I have. To each their own, though.


Mitsubishi Kakikata 2B (and some info about other pencils for children)
Mitsubishi must be one of my favorite pencil manufacturers. I first saw the Kakikata pencil on Bobby Truby’s website Brand Name Pencils, where he has a blue one for sale. My heart was drawn to the red one, though, which has been on my search list for quite a while. Luckily, Enpitsu Philia of 鉛筆五四三 was able to help me out. Many, many thanks her!
Kakikata (書き方) means “How to write” in Japanese (I believe, although please correct me if I am wrong). The pencil is made just for that.
The round barrel makes it very easy to hold. The barrel is painted very bright colors. I have an example in red and orange, though I am aware of sky blue being another option. The colors seem fitting for a pencil meant for schoolchildren.
The lettering is silver foil on the front. On the back, there is a combination of gold foil and white paint. It looks like the foil was applied well, although the age of the pencil is visible through the wear the foil has suffered from.

There is a small space on the pencil for the owner to write their name. There are two other spots on top. I don’t know Japanese, so I am not sure what they are for. If you’re able to figure it out, please drop a comment or send me an email!

The pencil itself is made very well. The lead core is well centered, with the two halves of the wood matching in both grain and color. The halves are joined well and there is no gap between the pieces.
The paint is chipping at the edges, though I suspect this to be a result of its age rather than a manufacturing issue.
Unless I’m magically able to accumulate many, many of these pencils, I probably will never sharpen one. Honestly, I’m very satisfied with my Hi-Unis and 9800s and don’t feel a need to put another pencil into my rotation.
However, I suspect that these, along with my French Mitsubishi Uni and Mitsubishi White Pencil, will remain in my collection as “things I like”.

Some other info:
If you’re interested in other Kakikata pencils, Mitsubishi still produces a version, item number 4653. Pencil Talk did a short write up on these pencils here. There is also the Mitsubishi NanoDia, which, while not having the Kakikata label, is labeled as “for kids”. Pencil Talk also did a review of them here.
Sticking with Japanese manufacturers, Tombow has their ippo! pencil, which is categorized on their website under Kakikata. Here is a link to a random review I found on the internet: link. Gunther, from Lexikaliker, also mentions this Tombow Blue pencil that is marketed to kids. I can’t read German, but if you can or if you’d like to look at pretty pictures, here is a link.
Lastly, Staedtler also produced their own Kakikata pencil released ca. December 2016. I am working on getting my hands a box of each set, but in the mean time, please check out Bleistift’s post here.
French Mitsubishi Uni HB
Sometimes, I’m just drawn to certain things. For some reason, white pencils have always been one. I saw this Mitsubishi Uni HB on Bobby Truby’s Brand Name Pencils. I was adding a bunch of pencils to my cart, but later on forgot about it until I contacted him about a trade, in which this Franco-Japanese pencil was included!

Getting the pencil in person, I found an odd beauty to it. Like many of Mitsubishi’s higher end pencils, foil was used on the lettering. The gold foiling can be seen on other pencils, such as the Hi-Uni (my personal favorite), but the hardness was embossed using a purple/magenta foil. Might sound like an odd combination, but I sure wish they made other pencils with this purple foil on white lacquer combination.

On the reverse of the pencil, there is a set of three sentences in French: “Je tu veux te donner un coup de point. Je t’aime. veux t’embrasser.”
Pardon my French, for it is rusty (non-existent), but using Google Translate, I came up with the translation of: “I want to give you a punch. I love you. I want to kiss you.”


Translated, it sends some mixed signals, but perhaps it’s trying to be romantic? I could come up with some theories, but it would all just be conjecture.
I’m not one for clutter, but this is another one of those pencils that won’t get sharpened or used. Maybe it’ll be a gift for a special lady friend, or maybe I’ll just like it so much and keep it. I think I need more.
If you’d like to buy one, I believe Bobby Truby still has some over here (I didn’t get paid for this link). Try not to buy them out, though. I still need to stock some up for the future.

Chris Reeve Giraffe Bone Mnandi
Introduction
The Chris Reeve Giraffe Bone Mnandi is what I would consider to be my grail knife. It isn’t too big, nor is it too small. It has some of the highest tolerances and best craftsmanship one can find in any production knife.
This will not be a review. I do not plan on using this knife and will only carry it on certain occasions. For the most part, it will be relegated to fondling at home and a special spot on my shelf.
Specs
Date of Manufacture: October 22, 2003
Blade Material: CPM S30V at 58-59 RC
Blade Length: 2.75″
Handle Material: 6Al4V Titanium
Overall Length: 6.375″
MSRP: $400
Video
Coming soon.
Packaging and Paperwork
Luckily for me, the knife came with all of its original packaging and documentation.

The box is interesting, as it is the older rectangular style. Since the knife was made in 2003, it only has the stickers for winning the 2000, 2001, and 2003 Manufacturing Quality Award.

The right end of the box has stickers labeling the contents.

Inside, there is a small sheet containing information about this specific limited edition.

There is also the original birth card, which is often lost over the years. It is completely handwritten, in comparison to newer cards, which only have handwritten dates and Chris Reeve’s signature.
Included Items

There is an Allen wrench that comes with each knife. I believe they were all taped to the lid of the box, as shown. They are 5/64″, which fit the screws on the knife.
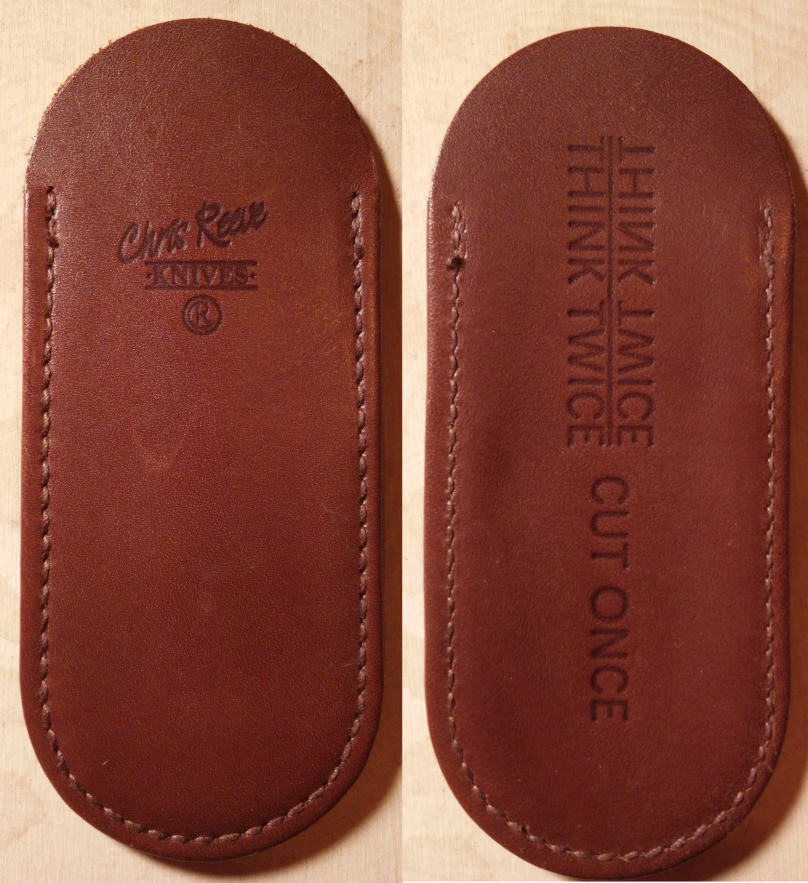
Additionally, there is a small calf skin pouch. The are still manufactured, although I have heard that there are quality and design differences between the old and new versions. It is quite interesting that this pouch is completely new, as it doesn’t show any sign of stretching at all.
Newer Mnandis come with a microfiber cloth and fluorinated grease. This one had neither.
Design
The Mnandi features the Chris Reeve Integral Lock design. In essence, it is a one piece framelock. The slabs of giraffe bone are not scales or overlays, but are, in fact, inlaid into the titanium scales. The titanium is slightly milled to precisely fit the giraffe bone. They are attached using 3M VHB (Very High Bond) tape.
The Mnandi has 13 different parts different parts.

1. Front Scale
2. Blade
3. Back (lockbar side) Scale
4. Pivot
5. Smaller (rear) washer
6. Spacer
7. Larger (front) washer
8. Bushing
9. Long screw
10. Body pin (product page)
11. Back spacer (product page)
12. Clip (product page)
13. Short screw (product page)
14. Allen wrench
I will be doing a write-up as well as a video tutorial on how to disassemble and lubricate a Mnandi. It will be linked here after it is complete.
Fit and Finish
Tolerances are great. There is no blade play (side-to-side, up/down, back/front) at all. The blade centering is perfect both closed and opened. The lockup is good at around 50%. The lockbar itself is still, although not overly so. I never worry about the knife closing on itself.

The hollow grind is symmetric and incredibly thin.


Functionality
As I mentioned in the introduction, I do not plan on using this knife. Chris Reeve Knives does not offer re-blades for pre-2011 knives, preventing me from acquiring an extra blade to use. Furthermore, as Tim Reeve, son of Chris Reeve, pointed out, using the knife would eventually show wear on the handle, which would reduce collector’s value over time.
However, I still do find occasions to bring the knife out. The clip looks very innocent and fashionable when clipped on a shirt pocket. It is a nice accessory to have and an easy way to conceal a knife in situations where it something larger, like a Sebenza, might not be appropriate.
Value
Precises of this piece have varied wildly through the years. The original MSRP was $400, which was a small premium over the a regular Mnandi. Prices did not appear to increase until recently, when fewer and fewer have been surfacing on the market.
Previous Sales:
October 2003: $400 on Knifeart (Link)
January 2006: Unknown on British Blades (Link)
June 2008: $445 on Bladeforums (Link)
May 2010: $325 on Bladeforums (Link)
December 2016: $1750 on Bladeforums (Link)

Chris Reeve Giraffe Bone Mnandi: Unboxing/First Look
I’ve been chasing after this knife for quite a long time. Now, it’s finally in my hands.
Specs:
Date of Manufacture: October 22, 2003
Blade Material: CPM S30V at 58-59 RC
Blade Length: 2.75″
Handle Material: 6Al4V Titanium
Overall Length: 6.375″
The Unboxing
Some First Observations
The Chris Reeve Mnandi has always appealed to me due to the elegant curves the knife has. The handle has a slight arc in it which continues on through the blade. Now, holding the knife in person, I can attest to the aesthetics beauty of the knife. I seriously cannot get over the curves.
The build quality is exceptional. There is no blade wiggle of any type and the inlays are fitted perfectly. And that titanium milled clip is just a work of art.
I’ll do a full on review after I spend some more time with the knife. Until then, enjoy some preliminary photos of the knife.
Pictures


Mike Draper Mini Titanium Spatula Review
Introduction
A key tool in food preparation is a good spatula. They can be used to flip burgers on the grill or to make the perfect egg. Mike Draper gave his spatula high end treatment with the use of titanium. Coming in both standard and mini sizes, the shiny titanium is definitely a show stopper. However, is the titanium just a gimmick or is there value to its usage?
This product was provided by EatingTools for review.
Specs
Maker: Mike Draper
Materials: 6AL4V Titanium, stainless steel screws
Dimensions: 2.125″ x 2.875 x 7.875″, 0.22″ thick
Weight: 1.5 oz
Price: $32.50 from eatingtools.com
Design

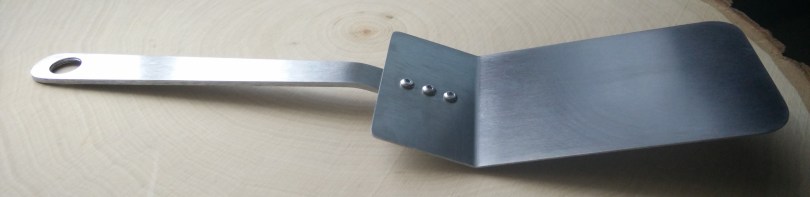
Mike Draper has two sizes of spatulas available: A larger “standard” spatula and a mini spatula. The basic shape of the two are the same, but there are also some differences. The larger version has both an angled and a flat blade style.

Additionally, the larger version uses four screws instead of only three on the mini version. The butt of the handle has two different designs. One version is curved, matching the curves of the drilled holes. The other version has a slightly pointed end.

On both versions of the spatula, there are two main parts consisting of two pieces of titanium, a handle and a blade. The blade has a single bend in it, giving it rise up to the area that connects to the handle.

The handle also has a bend, which corresponds with the bend in the blade. There is a hole drilled at the end of the handle for a wrist thong or for hanging up.

Fit and Finish
When it comes to any handmade product, fit and finish is a defining feature of its quality.

The fit and finish on the spatula is great. The spatula has a brushed finish that resists scratches and wear well. However, it is a finger print magnet. Thankfully, a wipe with a cloth will remove the oils left from your hand.

One area that was a tad imperfect was the screws. I believe that the screws were longer and had to be cut down to size in order to be flush with the handle. Somewhere during the progress, it appears that an actual piece was trimmed off. The brushed finish, however, looks great on the screws.
Functionality
To test the spatula, I put it to work making eggs every morning. Even with its small size, flipping eggs is a breeze on my cast iron. With all metal spatulas, I would not recommend using this on a non-stick pan.

The titanium is very flexible, though it retains its shape very well. This makes getting under eggs very easy. The handle, although un-insulated, does not get hot.

Food particles can easily get stuck on the surface, but a bit of scrubbing and elbow grease makes it look like new again.
With its small size, the spatula easily fits in a backpack for camping trips. I took it out into the woods with my cast iron for a nice cookout. I definitely recommend titanium tools and utensils after this experience. Between my American Kami Spork, TiStix, and Spatula, I was never worried that my tools were going to give out. The spatula, even with its thinness, did not suffer any deformation on the trek and returned just the way it left.
Conclusion
A spatula might seem like something you’d pick up at the dollar store, but the this titanium spatula really shows you how great a cooking tool can be. Its durability is second to known and its design really showcases craftsmanship at its best.
