Montblanc 149 Review

Introduction

Montblanc, along with Parker and Waterman, seems to be one of those fountain pen brands that even non-enthusiasts seem to know. Their pens can sometimes be quite gaudy, although their Meisterstück line has a certain classic feel to them. The Meisterstück 149 is the largest and most expensive pen in their non-limited edition model lineup. Does it stand up to the price it takes to own

The pens I will be reviewing today were purchased from a local seller and were manufactured in the 1980s. The pens are near identical except for the nibs.

Specs

Length: 14.7cm
Diameter: 14.8mm
Weight: 29g
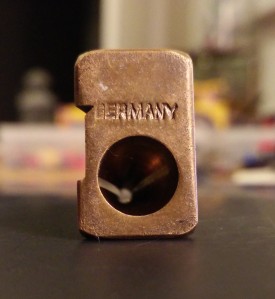
Place of manufacture: Germany
Price: $935 (retail), $650-800 (street)

Design

The Montblanc 149 has been produced since the late 1940s. Since the beginning, it has featured the classic cigar shape, a piston filler, and a big number 9 nib.

The barrel was initially made of celluloid, although, they later switched to a material they call “precious resin”, essentially a hard, secretly formulated plastic.  The material does not scratch easily, although the scratches that do exist are quite obvious in contrast to the high polish surface.

IMG_20170721_155603_edited

The barrel is made from a single piece. Later varieties are made from two pieces. There is an ink window near the grip section. It is slightly tinted, with vertical stripes. The threads for the cap are cut at the height of the barrel.

IMG_20170721_154258_edited

In contrast to the black body, there is plenty of gold trim. On the cap, there is a band with the words “…”. The engraving (or perhaps stamping)  The clip has the place of manufacture “GERMANY” stamped in it. On later models, a serial number was also added. The number can be helpful in dating a pen.

IMG_20170721_154209_edited

The nib material has also changed over the years, switching from 18 karat to 14 karat and then back to 18 karat gold, with different styles of plating over the years, ranging from dual tone to triple tone.

IMG_20170721_154416_edited

The feed is made from ebonite. Fins are cut on both sides, with a solid spine down the middle. This is the “split feed” variety . Later feeds were made from plastic.

IMG_20170721_160202_edited

The two stage piston was originally made of brass (the threads) and plastic, although in recent years, the entire assembly is now from plastic. The first few turns of the knob does not move the piston. This is to prevent one from accidentally discharging ink. Following the first few turns, the piston begins to go down. The reservoir has a very large capacity of 2ml.

IMG_20170721_155526_edited

A very nice timeline was created by “DKbRS” on The Fountain Pen Network. The thread can be found here. I used the guide to help me date my pens.

Fit and Finish

IMG_20170721_155250_edited

As with most Montblancs, the fit and finish of the pen is mostly near perfect. The nibs are hand-finished and it shows. The tines are not perfectly centered (although as I’ll mention later, this does not affect functionality in the least). The engravings are also nicely done, although they are not perfectly symmetrical.

The piston is very smooth. The tension twisting the knob is very smooth at every stage. When the knob is in its closed position, there is no gap between the knob and the body. When the piston is fully extended, there is a bit of give, which immediately springs back when you let go. I assume this is a indicator that the piston is fully extended and to help prevent accidentally snapping the piston.

IMG_20170721_154354_edited

The cap fits very well on the body. The threads fit very tightly, with no movement between the cap and body when closed. The engraving on the gold band around the cap is done very nicely and is consistent between pens.

Functionality

IMG_20170721_160112_edited

Filling the pen is very easy with the piston filler. A plunge or two fills most, if not all of the reservoir. Flushing out ink, however, can be quite time-consuming. The large feed accommodating the large nib has the unfortunate ability of retaining ink remnants. Soaking the entire pen in water seems to help with the process, though.

IMG_20170721_160933_edited

The pen is a joy to write with. With such a large pen, the grip section is very comfortable and is at a nice balance point for the pen when un-posted. Due to its large size, the pen is probably best used un-posted. That being said, one probably wouldn’t want to risk scratching the pen by posting the pen anyways. There are some posting marks on the barrel of one of the pens. Not very deep, but noticeable to a careful eye.

IMG_20170721_160918_edited

The nib is surprisingly flexible and the pen is able to produce a multitude of line variations. The feed keeps up no matter how wide the tines are spread.

Flexing the nib does require more force than vintage pens. Although the pen is pre-owned, I don’t believe the pen was used much. Even so, the nib is tuned to be very smooth from the factory.

The clip is springy and holds a pen firm in a shirt pocket. It does not stretch much, though, and would not comfortably clip into a jean pocket without permanently bending out of shape.

Value

The pen retails for $935, making it the most expensive pen from Montblanc’s regular lineup. That being said, I would have a hard time justifying buying the pen retail. Luckily, the pen is commonly found, new, from different retailers for a few hundred lower. Pre-owned, the pen can be found for $3-500, depending on the year that it is manufactured and the condition.

For me, the bottom line is that the pen is a manufactured, plastic-bodied pen. While there is some value in the nib, which is made in house, and the fact that it is hand-tuned, one could get a similar feeling from a pen made by on of Japan’s big three for much less.

Conclusion

All this being said, the Montblanc 149 is a very nice pen, with a very ugly price tag. Sure, it is big, gorgeous, and carries the allure of a brand like Montblanc. However, I would expect so much more from a pen at the price range. Therefore, these pens will soon no longer be in possession.

Midori MD Pencil Review

Introduction

Midori is very famous for their Traveler’s Notebooks and their brass products. While they have produced pencils in the past, for their brass pencil extenders, the Midori MD pencil is their first full size pencil. The MD line (which I believe stands for Midori Diary) is known for its simplistic design and light colors. Does Midori pull through with their first full-length woodcased pencil?

Specs

Shape: Hexagonal
Length: 176mm
Diameter: 7mm
Weight: 5g
Place of Manufacture: Japan

Design

IMG_20170721_142517_edited

The pencils come in a pack of six within a slim plastic package. There is a small label in the packaging, similar to those included with other Midori MD products. As always, there is nothing gaudy about the packaging.

The writing on the label is playful and is meant to mimic handwriting. Luckily, it is not hard to read. The back of the label only has a barcode and some recycling information.

The pencil itself is very simplistic. The barrel is hexagonal and is a light cream color. The paint is matte and does not reflect any light. While it is smooth, you can definitely “feel” the pencil between your fingers. There is no ferrule.

IMG_20170721_143605_edited

There is black lettering on one side of the pencil with the words “Midori MD” as well as “B” to indicate the hardness. There is no other writing or imprinting on the pencil.

Fit and Finish

The pencils feel solidly made, although the paint is not the best. It appears as though the paint rubs off easily, as seen in the above pictures.

The lettering is pretty good, although not that sharp on the edges. This might have been done on purpose as part of the font, but it looks a bit sloppy.

The two halves of the barrel are matched well and the core is well centered. However, the paint around the edges came chipped. It is not apparent whether this happened during manufacturing or during packing.

Functionality

IMG_20170721_151228_edited

Sharpening the pencil in my Carl Angel-5 was very smooth and easy. As expected, the pencil left some bite marks in the barrel. It did not expose bare wood, but, instead, the marks were paint filled.

IMG_20170721_151357_edited

The point was moderately long and well rounded. The barrel did not split upon sharpening. There was no excess shavings hanging on after sharpening.

IMG_20170721_151401_edited

The core is a tad harder than most Japanese pencils of hardness “B”, writing closer to a Mitsubishi Hi-Uni “HB”. The writing experience was “all right” at best. It is better than your run-of-the-mill dollar store pencil, but, at least for me, the amount of feedback the core was giving me was somewhat unpleasant.

However, a few days later, I was curious enough to pick it back up and give it another go. During my second attempt at using it, I found it to be better than I first thought, and definitely usable, although it will not be winning any awards in my book.

I will note that my opinion on the tactile feedback that the pencil gives is just my take on it. I am sure some will appreciate it.

IMG_20170721_152115_edited

That being said, though, I do like how dark of a line the pencil puts down. Furthermore, it erases easily and point retention is pretty good.

Conclusion

I am a bit disappointed by these pencils. The quality was not as good as I was expecting and the writing experience was not not up to par in comparison to Midori’s paper offerings (in my opinion). Aesthetically, once you get over the dirtied surfaces, the pencil is elegantly simple and is comparable to the Mitsubishi White Pencil in looks.

I probably won’t be picking any more of these up in the future. I’m still on edge about whether I’ll keep the ones that I have. To each their own, though.

IMG_20170721_142829_edited

Mitsubishi Kakikata 2B (and some info about other pencils for children)

Mitsubishi must be one of my favorite pencil manufacturers. I first saw the Kakikata pencil on Bobby Truby’s website Brand Name Pencils, where he has a blue one for sale. My heart was drawn to the red one, though, which has been on my search list for quite a while. Luckily, Enpitsu Philia of 鉛筆五四三 was able to help me out. Many, many thanks her!

Kakikata (書き方) means “How to write” in Japanese (I believe, although please correct me if I am wrong). The pencil is made just for that.

The round barrel makes it very easy to hold. The barrel is painted very bright colors. I have an example in red and orange, though I am aware of sky blue being another option. The colors seem fitting for a pencil meant for schoolchildren.

The lettering is silver foil on the front. On the back, there is a combination of gold foil and white paint. It looks like the foil was applied well, although the age of the pencil is visible through the wear the foil has suffered from.

IMG_20170721_141232_edited

There is a small space on the pencil for the owner to write their name. There are two other spots on top. I don’t know Japanese, so I am not sure what they are for. If you’re able to figure it out, please drop a comment or send me an email!

IMG_20170721_141454_edited

The pencil itself is made very well. The lead core is well centered, with the two halves of the wood matching in both grain and color. The halves are joined well and there is no gap between the pieces.

The paint is chipping at the edges, though I suspect this to be a result of its age rather than a manufacturing issue.

Unless I’m magically able to accumulate many, many of these pencils, I probably will never sharpen one. Honestly, I’m very satisfied with my Hi-Unis and 9800s and don’t feel a need to put another pencil into my rotation.

However, I suspect that these, along with my French Mitsubishi Uni and Mitsubishi White Pencil, will remain in my collection as “things I like”.

IMG_20170721_140836-01_edited

Some other info:

If you’re interested in other Kakikata pencils, Mitsubishi still produces a version, item number 4653. Pencil Talk did a short write up on these pencils here. There is also the Mitsubishi NanoDia, which, while not having the Kakikata label, is labeled as “for kids”. Pencil Talk also did a review of them here.

Sticking with Japanese manufacturers, Tombow has their ippo! pencil, which is categorized on their website under Kakikata. Here is a link to a random review I found on the internet: link. Gunther, from Lexikaliker, also mentions this Tombow Blue pencil that is marketed to kids. I can’t read German, but if you can or if you’d like to look at pretty pictures, here is a link.

Lastly, Staedtler also produced their own Kakikata pencil released ca. December 2016. I am working on getting my hands a box of each set, but in the mean time, please check out Bleistift’s post here.

French Mitsubishi Uni HB

Sometimes, I’m just drawn to certain things. For some reason, white pencils have always been one. I saw this Mitsubishi Uni HB on Bobby Truby’s Brand Name Pencils. I was adding a bunch of pencils to my cart, but later on forgot about it until I contacted him about a trade, in which this Franco-Japanese pencil was included!

collateuni

Getting the pencil in person, I found an odd beauty to it. Like many of Mitsubishi’s higher end pencils, foil was used on the lettering. The gold foiling can be seen on other pencils, such as the Hi-Uni (my personal favorite), but the hardness was embossed using a purple/magenta foil. Might sound like an odd combination, but I sure wish they made other pencils with this purple foil on white lacquer combination.

IMG_20170721_145411_edited
Check out the pretty floral pattern as well as that purple foiling!

On the reverse of the pencil, there is a set of three sentences in French: “Je tu veux te donner un coup de point. Je t’aime. veux t’embrasser.”

Pardon my French, for it is rusty (non-existent), but using Google Translate, I came up with the translation of: “I want to give you a punch. I love you. I want to kiss you.”

IMG_20170721_145338_edited
“I want to give you a punch.”
IMG_20170721_145341_edited
“I love you.”
IMG_20170721_145344_edited
“Want to kiss you.”

Translated, it sends some mixed signals, but perhaps it’s trying to be romantic? I could come up with some theories, but it would all just be conjecture.

I’m not one for clutter, but this is another one of those pencils that won’t get sharpened or used. Maybe it’ll be a gift for a special lady friend, or maybe I’ll just like it so much and keep it. I think I need more.

If you’d like to buy one, I believe Bobby Truby still has some over here (I didn’t get paid for this link). Try not to buy them out, though. I still need to stock some up for the future.

Pentel Clic Eraser Review

Introduction

IMG_20160804_230200

I like push erasers. They provide a precise, long lasting erasing in a compact form-factor. However, since an eraser only erases as good as the eraser material, not only is the design of the push-mechanism important, but the refills themselves have to be decent.

The Pentel ZE-21 and the Pentel ZE-22 are the two models of “Clic” push erasers. The ZE-22 can still be purchased at local office supply stores, while the ZE-21 has been discontinued. Today, we’ll be taking a look at the two and I’ll be explaining why the Pentel “Clic Eraser” ZE-21 is in my EDC.

Specs

Place of manufacture: Japan
Price: $3 (ZE-21, must be purchased from reseller), $4 for four (ZE-22), $16 (box of 24 ZER-2 refills)

Design

IMG_20160523_233251.jpg

The ZE-21 is made completely from plastic while the ZE-22 has a plastic body with a rubber grip. On both, pushing the pocket clip down and then forward extends the eraser. The clip assembly holds the eraser refill through friction.

On the ZE-21, the body is smooth down to the grip, which is simply the same material, but ribbed. It is not particularly grippy, but is textured enough to get a firm grasp on when erasing.

IMG_20160523_233303.jpg

IMG_20160804_225544
ZE-22 (right), ZE-21 (left)

The ZE-22 on the other hand has textured plastic, as well as a rubber grip with a texture of the same design. This adds a few millimeters to the diameter. The rubber is soft and can be removed.

The clips have slightly different designs with the ZE-21 having a flatter and more boxy look while the ZE-22 has more curves. The plastic used for the clip is darker and has a shiner finish on the ZE-22, which matches the type of plastic used on the body. On the other hand, the plastic used on the ZE-21 is duller and feels a tad rougher.

The end caps on the ZE-21 and the ZE-22 differ a bit, with the ZE-21 having a more refined look with an indentation, while the ZE-22 is flatter. The flatter look accentuates the molding lines on the plastic, although the ZE-21 has a very noticeable bump in the middle of the cap.

IMG_20160523_233351.jpg

The refill comes either in boxes of 24 or individually. The individual refills are packaged in thin plastic with a sheet with instructions surrounding the refill itself.

Though the model number is ZER-2, it appears that the “2” was not stamped on this particular packaging or that the packaging is generic.

Fit and Finish

IMG_20160806_110314

The product was not meant to be an expensive one and the fit and finish is reflective of this. There are molding lines on the plastic and the parts have uneven colors. The lettering on the body is a bit uneven and is prone to wear.

Functionality

The first thing you notice when you see my ZE-21 is that the paint has worn off the body. I didn’t intentionally scrape the paint off with my nail, but instead, the paint wore off through use and wear in wherever it was thrown into. The force required to extend the eraser has lessened over time, although this is only obvious through the different sounding clicks that it makes.

IMG_20160806_110955
Eraser Test on Rhodia Notebook

ZE-21 vs ZE-22

With respect to erasability, since the refills are identical, they have the same performance. However, while the eraser holders look similar and share many attributes, their differences make one superior, in my opinion, to the other.

IMG_20160523_233308.jpg

The ZE-22’s action does not feel sturdy after multiple uses. I believe this to be because of the design of the clip itself. The clip, while stylish, is connected by a thin piece of plastic. On the other hand, the ZE-21 is held together with a shorter piece of thin plastic, giving it less wiggle.

IMG_20160809_222409

Further, the ZE-22’s grip “improvement” is a short term and unnecessary improvement. With the rubber grip, the ZE-22 is no longer able to be placed flat on a surface. Further, the grip accumulates dirt and grime quickly. After a while, the elasticity of the rubber will degrade and the grip will not fit flush with the body of the eraser.

IMG_20160523_233105

The ZE-21, on the other hand, is simply one piece of plastic. As such, it’s only weakness is the “press” tab on the side of the eraser, which can lose its tension over time. This tab can However, as this is not necessary for the eraser’s usability, it is not important that it remain in perfect condition.

Conclusion

The push eraser has a special place in a stationery user’s arsenal. It is compact and convenient while providing accurate erasing. The Pentel Clic series uses the polymer eraser refills that Pentel is known for in a mechanism that is cheap and simple. While Pentel has tried to improve on the product, the older ZE-21, in my opinion, beats out the newer ZE-22. However, either eraser would prove to be useful and, at this price point, getting a few spares won’t break the bank.

rOtring 600 Gold 0.5mm Review

Introduction

IMG_20160620_122111

I love my rOtring 600. The solid construction and the attention to detail make it a joy to write with. However, the thin tip is fragile and prevents it from being pocket friendly. rOtring’s answer to this was the rOtring 600 Gold. It has a modern relative, the rOtring 800, that has been met with relative controversy due to fit and finish issues. How does the rOtring 600 Gold match up with its relatives?

Specs

Place of Manufacture: Japan
Length: 13.3cm (retracted), 14.3 (extended)
Weight: 34 grams

Design

IMG_20160711_160721

The rOtring 600 Gold can be easily disassembled to show all the main components. On the back end, the eraser cap and eraser can be removed simply by pulling. While the pocket clip can be removed, it is firmly attached and removing it would require a large amount of force. The pocket clip itself is engraved with “rOtring” with a stylized “O”.

IMG_20160620_122202

On the front end, the knurled grip can easily be unscrewed. Following that, the tip and main mechanism is exposed. The tip can also be removed by unscrewing, although it is a tad more difficult as the mechanism itself will turn as well if it isn’t held tightly.

IMG_20160713_160824

One interesting thing to note is that the mechanism is all metal and that there appears to be no plastic parts (except for perhaps the lead indicator). This probably has no impact on the actual performance or longevity of the pencil, but it does give the pencil a different feeling knowing that it is all metal.

rOtring pays a lot of attention to these small pieces of detail. The engraving on the clip seems pretty standard, but they also marked the lead size on the end cap. This is not found on the newer rOtrings.

The main feature of the rOtring 600 Gold is the retracting mechanism. When the pencil is closed, the tip is retracted 3-4mm into the grip, which protects it from damage. Further, when the pencil is retracted, the mechanism is locked and no lead can be extended.

IMG_20160620_122357

The mechanism itself is activated by twisting the end portion of the pencil. This also houses a lead grade indicator, which also rotates. Here is where you will also find their iconic “red ring” (rotring in German).

It can be easy to identify why the pencil was called “gold” due to the gold hardware on the tip and at the end of the pencil.

Fit and Finish

I bought this pencil used, but through the wear and tear, there are still some aspects of the fit and finish that I can comment about. The tolerances are not as tight as I would have expected, though not so bad to the point that it is a bother. The end mechanism that rotates to extend the tip has some wiggle, but the pencil as a whole, however, does not rattle.

IMG_20160620_122248

There is very obvious wear to the finish. It appears as though someone had tried to move the clip and, instead, scraped off part of the logo and quite a bit of the coating. The finish, however, seems very tough and it is a bit confusing to me as to how much force was required to do this type of damage.

The knurling is a bit blunted by design and does not provide the grippiness that is usually associated with more modern rOtring products. However, during writing sessions, I did not find myself losing grip of the pencil and it did not have as big of a “bite” as rougher knurling does.

Functionality

This pencil meets the expectations that I had for it. The clip holds the pencil securely to my jeans with no wiggle. I have no fear of it falling out of my pocket at anytime. It hasn’t fallen apart or had the tip accidentally extend while the pencil was in my pocket. It can really easily be said that the pencil is very pocket friendly, especially because of the mechanism lock.

IMG_20160712_221936

Extending the pencil is quite easy. Exactly a half turn of the end piece is required to extend the tip. The tip will “snap” into place, with an audible click.

In order to turn the lead indicator, the end piece must already be fully extended in the direction that you want to turn the lead indicator. Otherwise, you will end up extending or retracting the pencil instead. While some may think of this as a flaw, as rOtring did as they removed the lead indicator on the rOtring 800, I personally think the lead indicator is a nice touch and is very helpful.

As for writing experience, once the tip is extended, it feels just like a rOtring 600. While I am sure the weight distribution is different, they are both hefty enough that I cannot tell the difference. The tip has a bit of wiggle, but when the lead touches the paper, it no longer moves.

I had an issue where the lead kept on breaking and the pencil was becoming hard to twist open. I soon realized the problem was that the tip was unscrewing itself ever so slightly. The extra length that it gave made twisting the pencil open harder and, because it wiggled more, the lead was more prone to breakage.

Replacement erasers seem to be near impossible to find. rOtring 600 erasers do not fit as they are a tad too big. I have heard that rOtring 800 erasers will fit, but I have yet to try them. I will update the review once I do.

Comparison to rOtring 600
IMG_20160712_224551

The body of the rOtring 600 and the rOtring 600 Gold are the same length. The tips, however, are a bit different. The tip of the rOtring 600 Gold is slightly longer, though the slim sleeve area is the same length.

The knurling is much milder on the rOtring 600, as previously stated. The rOtring 600 has pyramid shaped knurling, while the rOtring 600 Gold has flat knurling.

IMG_20160712_220049

The clips are nearly the same, although I found the rOtring 600 had deeper engravings. Also, the rOtring 600’s lead indicator text was a bit whiter and the lead indicator itself was a bit harder to turn. This, however, may be because the pencil is newer and has not sustained the same amount of wear as the rOtring 600 Gold has.

Conclusion

Given the choice to pick the rOtring 600 Gold or the rOtring 600, I’d have to pick the rOtring 600 Gold again and again. The retractable tip simply provides so much more usability to the pencil. While there are more moving parts, when all the components are properly fitted, the pencil is a mechanical monster. I’ll be treasuring this pencil for years to come and it’ll definitely never be too far from my side.

Curved Blade Sharpeners: The Faber 4046/4048

Today, we’re going to be talking about the curved “Janus” sharpeners made by A.W. Faber and Faber-Castell.

4046-4047ad
An old advertisement for the A.W. Faber 4046 and 4047 (1)

A.W. Faber 4046

patent
(Patent #: DE964034)

From some research on the internet, it would appear as though the 4046 was manufactured between 1930 and 1935. My correspondence with the Faber-Castell historian revealed that first 4046s were probably sold in 1935. I have seen two variants: one where the corners are a little rounded and another where the corners and sharp. The historian verified my findings.

The blade on the 4046 has a single caret ( < ) on one side and a double caret ( >> ) on the other.

Production of the 4046 was stopped temporarily during WWII, but resumed after the war. It was now produced in two different metals: brass and duralumin.

Patent #: DE964034 is for a curved sharpener. Gunthur Schmidt of Lexikaliker mentions (albeit in German, which I know little of) that this patent showcases a curved blade sharpener with what appears to be a smaller hole for sharpening leadholders. This makes use of both sides of the blade.

IMG_20160704_221922
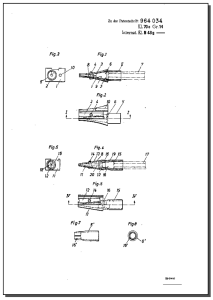
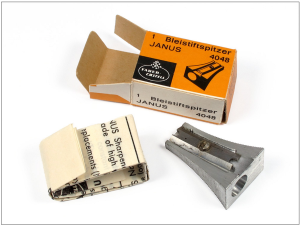
I managed to purchase an A.W. Faber 4046 off of Etsy for a decent price. Faber 4046s go for between $40 and $100 depending on condition.

Mine is a fairly worn example.The brass is showing signs of uneven oxidation. I was a bit concerned by the corners, edges and jimping, but the metal itself has worn down very little.

The blade itself has no rust, which really surprised me due to the high carbon content of the blades. There is some discoloration in some areas, though, but none that would change its usability.

One thing to note about purchasing a used sharpener is that the blade is you cannot resharpen the blade. This will change the distance between the blade and the edge of the sharpener, causing an oddly shaped pencil point.

IMG_20160704_221942
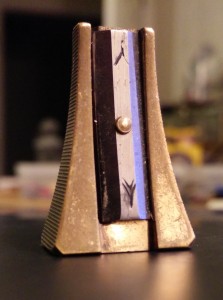
If there was anything that disappointed me about the purchase, it was the condition of the screw. It looked as though someone used a screwdriver that was too small and completely mangled the head of the screw. I have not attempted to remove it yet, but once I do, I will be trying to find a replacement at once.

One interesting thing to note is that the place of manufacture stamp. Since it says “Germany”, we know for sure that it was produced before the Second World War or after reunification, of which the latter would be improbable.

I was quite impressed by the curvature of the sharpener. It’s just gorgeous at every angle.

Sharpening a pencil is quite easy. The knurling is grippy enough that the sharpener stays firm in the hand. The blade is a bit dull, but it has enough life in it to give a pencil a point. I decided, for my first pencil, to sharpen a Mitsubishi 9800.

Sharpening produced a mound of shavings. The shavings are very thin, but they are not very consistent. However, there were consistently strings of 5 to 10cm. The graphite shavings were not as nice though. There were some larger chunks, and it looked like pieces were chipped off.

The tip is quite nice. When compared to a pencil sharpened by the Angel-5, it is obviously convex. The tip length is similar, though the Janus gives a more consistent tip.

Faber-Castell 4048

magnesium4048
Magnesium Faber-Castell 4048 (1)

The Faber 4048 was produced from around 1965 till the early 1970s.

The Faber 4048 came in two varieties: one made of brass and one made of duralumin. They both came in a small yellow box wrapped in waxed paper instructions. The instructions appear to be the same for both versions.

The instructions are written in 5 different languages: German, English, French, Spanish, and Italian.

instructions

Transcribed: “You have made an excellent choice in the JANUS Sharpener No. 4048. It is a sharpener of precision. The double edged reversible blade is made of high quality steel, will provide you with constant long, needle-sharp points.

The blade can be changed simply and speedily, replacements (No. 4049) being obtainable through any good stationer or drawing office dealer.

Please do not attempt to remove any lead points, which may be caught under the blade, with other than a matchstick or other non metallic implement. Better still, loosen the screw and remove the particle of lead.”

The box itself is completely in German. There’s a picture of the sharpener on the front, with the Faber-Castell logo on the bottom left corner.

The edges of the box are either plain or have the item name on them. The box below was made in the 1960s. Boxes are same for both the brass and duralumin versions.

The blades on the 4048 are different from that of the 4046. The arrows are now gone and the blade now has two indentations at each end. Further, the blade is screwed in through the top rather than the bottom. I have heard that the blades are interchangeable though.

Faber 4047

The 4047 were the replacement blades made for the 4046 and the 4047. They came in a small nickel tube. They supposedly contained half a dozen, as per the ad above, but for the most part, I have seen them containing three (perhaps due to use). Something else to note is that the replacement blades, at some point, having the caret symbols.

$_57 (1)
Ebay Auction #: 201205775017
$_57
Ebay Auction #: 201205775017


Faber 4049

4049
Faber-Castell 4049 (1)

The Faber  4049 appears to be the second variation of the replacement blades. Green boxes with white caps held five(?) blades. These were made for the Faber 4048 and the blades can most easily be distinguished from the Faber 4047 blades by the inclusion of the half circle cutouts at each end.

Picture Credit:
(1) www.lexikaliker.de
(2) My Pencils Draw Worlds

Carl Angel-5 Pencil Sharpener Review

Introduction

I swear, I’m not cluttering. I have my brass pencil sharpeners and a handful of knives to sharpen pencils with, but sometimes, I get lazy. And for those days, a rotary sharpener can help out. The Carl Angel-5 supposedly gives a long sharp point for a decently low price. But can this “Made in China” product have the quality to sharpen pencil after pencil? Let’s find out.

Specs

Place of Manufacture: China
Weight:
Dimensions:
Price: $20-25

Packaging

My Angel-5 came in a different packaging then the other Angel-5s on the shelf. I decided to take the risk, though, hoping that I got some older box or something. I haven’t really concluded with why this box is different. It doesn’t really matter though.

The front and back of the packaging had the same design, but the sides are different. One side showcased the sharpening capabilities, such as the clamp, while the other showcased the internal mechanism and the desk clamp.

IMG_20160621_141607

The top had a little sticker indicating the color of the sharpener (red in my case) as well as all three colors that are available: red, blue and black.

IMG_20160621_141713

Open the box, you see the sharpener on the left side of the divider. On the right side, there is the desk clamp. both are wrapped in plastic.

Fit and Finish

Starting with the clamp, the parts look like they are made well enough. The plastic parts show wear along what look like joints and are not polished. Further, there are lines and imperfections from the molding.

On the other hand, the metal parts are a tad porous and the stamped metal winged nut is not completely even. However, the threads are perfect and the nut has little play.

The sharpener itself is a beauty. The front features a steel plate that is super shiny. The shavings container sits underneath it and is plastic. They are both immaculate. There were no noticeable scratches or dents of any sort.

The body of the sharpener itself is made of metal and is painted red. I was unable to find anyplace where the paint had chipped. The paint is smooth all over and has a nice sheen to it. Because the body of the sharpener is also made of sheet metal, there are some small imperfections. For example, the areas where pieces are connected are not always perfectly spaced and small paint bubbles can appear. However, to complain about such issues is petty.

The back has  a cranked sided by two black screws. The crank is also made out of the same metal the front plate is made out of. At the end of the crank, a handle is attached with a rivet. It is a plastic ribbed handle that rotates 360 degrees The shavings container can be pushed out through the back, with enough pressure, as well as the front, although the crank will block it in its resting position.

The crank can be fully removed for cleaning or replacement. When removed, this reveals the inside of the pencil sharpener. Excess shavings can easily be cleaned out.

IMG_20160621_142627

The shavings container is quite spacious and it appears as though it can hold many shaving. It can be fully removed, and is fitted loosely enough such that it will fall out if the sharpener is tilted forward.

While the sides and corners look very nice, the bottom does have some scratches and molding marks. This is unavoidable and it was quite nice to see that Carl decided to make them only visible on the bottom.

The plastic material is a finger print magnet and I had to really wipe it down before I took a picture. The logo and name of the sharpener is printed on the outside of the container.

IMG_20160621_142306

The top of the sharpener has a sticker with the brand and name of the sharpener. Here, you can see some of the imperfections with the way the metal was fitted together and the subsequent paint issues. I would consider these minor, though, an acceptable at this price point.

Functionality

I decided to sharpen a Mitsubishi 9800 as my first pencil. I mounted the sharpener to my desk, before realizing that it was going to be hard to take photos, so I soon removed it. It works quite well, though. The sharpener felt sturdy and it would be pretty hard to accidentally knock it over. The plastic is soft enough that it wouldn’t dent a desk (not that my desk doesn’t already have lots of dents).

I extended the shiny metal section and prepared to sharpen a pencil. It was a bit intimidating to go about this. The sharpener was all shiny and perfect and there was not a speck of graphite dust anywhere.

I put the pencil in and, after a number of turns on the crank, the distance between the clamp and the sharpener decreased and my turns on the crank felt resistance-less.

IMG_20160703_094927

Out came a really nice point. It wasn’t the sharpest, but it was nice and long and well suited for writing. I am very pleased. But, I soon noticed something a bit discouraging.

The clamp really clamped down hard. On one hand, it’s a nice trait as it really pulls the pencil in firmly. However, it makes these really nasty dents in the pencil barrel. It’s most noticeable on the barcode area where it breaks through the lacquer and green is exposed.

It made a small pile of shavings. They were all nice and uniform and was easy to dump out. However, graphite dust stuck to the side of the shavings bin and it took quite a bit of time to wipe up the residue using a tissue and q-tip.

Conclusion

If I had to give a one word description of this sharpener, I’d say “good”, before going back and sharpening the rest of my working pencils. It’s fast and convenient and produces a nice point. If anything, my only complaint is with the dents it puts in the wood. That means that I probably will not sharpen many “nice pencils” in it, though this might change over time. That long point might just be too nice to pass up.

Caran D’Ache Swiss Wood Review

Introduction

IMG_20160603_123925

The Caran D’Ache Swiss Wood is often recommended by those who are looking for a new pencil for writing. It has a unique look, with the body of the pencil being constructed with a dark beech wood from the Jura forest, and a hefty weight. However, does the price and looks of this pencil translate into a good writing instrument, or is this pencil all talk and no write?

Specs
Country of Manufacture: Swiss
Price: $4-5 (retail), note that prices can vary wildly (Amazon prices it at $17)

Design

IMG_20160603_124004

The Swiss Wood has a base wood color. It is fairly dark and appears to be at least somewhat stained. The body of the pencil is further coated in what I think is wax. This gives the wood a smooth appearance in comparison to the raw wood that is exposed when the pencil is sharpened.

The end of the pencil is glossy red. This contrasts greatly with the rest of the matte brown body. The very bottom has a white cross.IMG_20160603_183158


The lettering on the pencil is done in a white paint. The lettering is punched into the wood itself, which makes the white lettering stand out even more. I particularly enjoy how the words on this edge of the pencil are all informative and useful. The last bit of the text states that the pencil is FSC certified, which is a nice touch considering the name of the pencil.

IMG_20160603_183144

On the back, the barcode is printed on, while the item number is again punched into the wood with white paint. While I’m not a big fan of these barcodes on pencils, Caran D’Ache did a good job of blending the barcode in with the rest of the design.

Fit and Finish

IMG_20160603_183235

I have had mixed experiences from the Swiss Wood. The lettering on my most recent purchase is foggy and not straight at all. It honestly looks like someone shifted the pencil mid print and dragged the ink up a fraction of a millimeter. There is also some discoloration on the wood near the end of the pencil.

IMG_20160603_123956

However, with my older Swiss Wood, the lettering was impeccable, with no bleeding or smearing. The wood was also a very consistent brown.

Functionality

IMG_20160605_190145

The wood feels a bit denser than normal cedar pencils (which it should be) and, as such, sharpening the pencil also has a different feel. A bit more force must be used to get consistent shavings.

As for the writing, the graphite core feels hard on the paper. It feels as though you are writing with a marble. The lead wear is similar as well. The takes a while to feel like you are writing on a flat surface instead of a round one.

The line it puts down is well suited for writing, though not as much for drawing.

The lack of lacquer on the pencil and the natural wood feeling make the pencil easy to hold. It feels grippy, but not overly so. Further, the weight of the pencil makes it feel significant in the hand, which makes writing pleasurable.

The pencil has a distinct smell to it. I don’t notice it until I put it up to my nose, while I have heard from some that the smell is fragrant enough to smell at arms length. The smell can be described as sort of a sawdust smell. It has some undertones of paint as well.

Conclusion

I understand why the Swiss Wood is well suited for writing. The lead core inside puts down a decently dark line while wearing down slowly. The wooden finish of the pencil makes the pencil pleasant to hold. While not a particular favorite, as I prefer a darker line than it produces, for longer writing sessions, or for days that I want to look a bit hipster, I would definitely pick up the Swiss Wood.

Plain Stationery & Homeware (直物生活文具)

I had a chance to visit Plain Stationery & Homeware in Taipei, Taiwan. Plain is store owned by Tiger, who runs the blog Stationeria (it’s in Chinese, but the pictures are already worth the click).

The store front is located at: 台北市羅斯福路三段210巷8弄10號, Taipei. It is about a 5 minute walk from the Taipower Building metro station.

Google maps is quite helpful in locating the street the store is on, but the store itself can be a bit hard to find. Though I have been here twice before, I still have some difficulty finding it this time around. I passed it once, before looping back.

IMG_20160527_141602

Walking into the store, the first thing one notices is how small the store is. It is the size of a small room and I bet a dozen customers would have a bit of difficulty walking about with ease.

IMG_20160527_141349
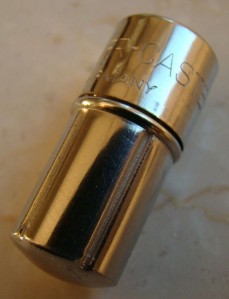
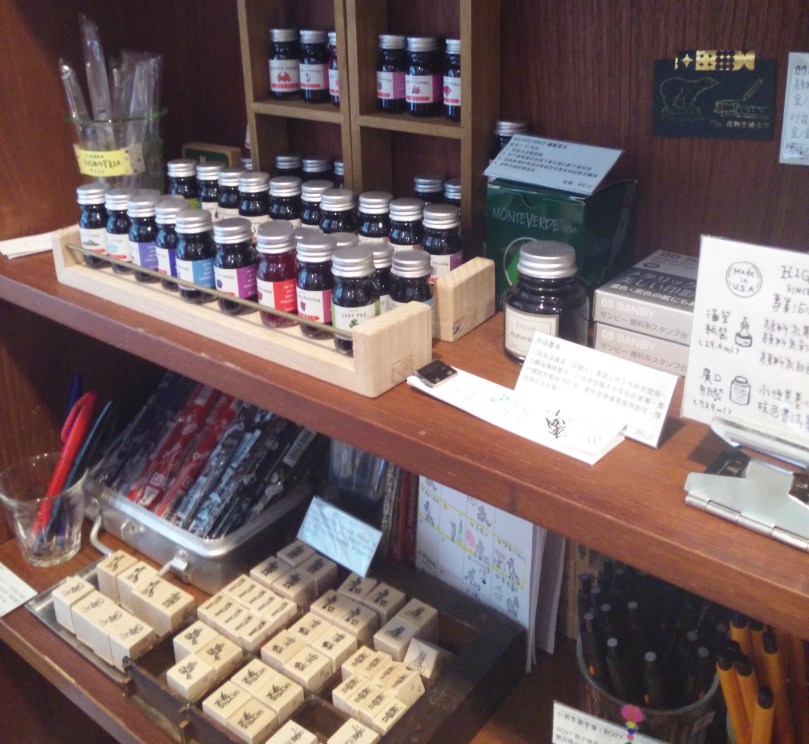
The store is arranged in the shape of a zero. The middle island has a wide range of pens and pencils including the Pilot Preppy and a variety of Autopoints. I personally enjoyed the selection of dip pens and nibs. If you ask, they will let you try out any of the handle and nib combinations with any of the inks that they have.

They sell stacks of 100 sheets of fountain pen friendly paper from a variety of companies.

There are also different types of paper tapes, such as for scrap booking or schedule making.

IMG_20160527_141425

TIMG_20160527_141419
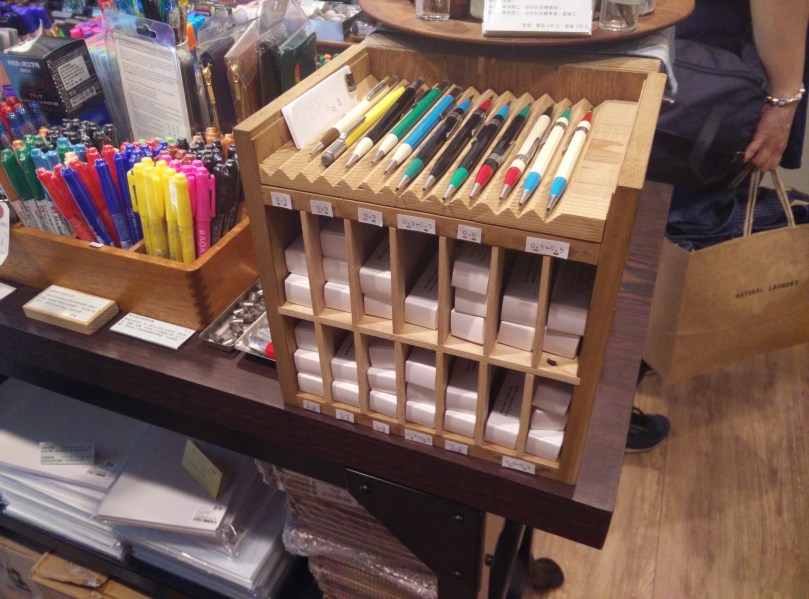
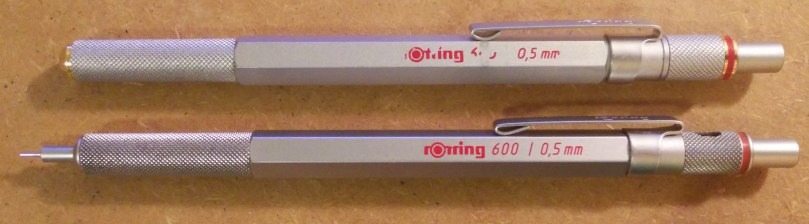
he counter holds some of the more expensive and the “deadlier” items. They sell whale shaped knives (it is where I bought mine) and a bunch of different Higonokamis. More recently, he has also been importing a few multitools and one-piece tools. Tiger managed to import Rotrings and Fisher items to his store and, due to their price, they are also kept behind the counter.

One thing to note, is that the store is very well decorated. Beyond the items that are for sale, there are a variety of interesting objects scattered across. Under the counter, there are various toys and other vintage objects. Don’t bother trying to purchase them though. When I went the first time, I tried to buy an old children’s play block with a bunny print by just placing it with the rest of my order. Tiger chucked and mentioned that it was not for sale.

IMG_20160527_141444On one of the walls, there is a wide selection of notebooks and clips. There are Field Notes, Campus, and Life Notebooks. Prices for Japanese products are much lower than in the US, while American products are a tad higher.

Much to my IMG_20160527_141453enjoyment, they have 0.4mm lead in stock, which is often hard to find in stores in the US.

Further down, they have some of my favorite pencils. They offer both Caran d’Ache pencils, such as the Swiss Wood, and Mitsubishi pencils. They also sell Palomino Blackwing pencils individually, which is convenient if you want to just try one out.IMG_20160527_141359IMG_20160527_141407

They have pencil extenders, caps, and clips as well as some more exotic items, such as the Gold Seed Eraser.

I love how they have samples of everything to try out. It’s nice to be able to hold a product in your hand before you buy it.

If you purchase a box of any item, they will give you the original box. Last time, I purchased 8 different pencils, and they gave me a Mitsubishi box anyways.

IMG_20160527_141435

The other wall has some pretty random objects. There are cubbies filled with mini rubber (or perhaps plastic, I’m not sure) animals. I believe they are for desk decorations although I would consider using them in a terrarium.IMG_20160527_141353

There are also a lot of other interesting pieces of stationery such as stamps and stamp pads and an assortment of scissors. One of my favorites is a pair that folds up.

They also have mini bottles of J. Herbin inks scattered about and  some vintage looking pens from Mitsubishi and Bic.

IMG_20160527_141505

IMG_20160527_141519

As to the “Homeware” part of the store, they sell teapots and cups and other objects I would consider “desk objects”, such as hourglasses.

I almost purchased a set of storage boxes, but decided that it might be a bit too cumbersome to bring back to the US.

They recently (early 2016, I believe), opened a coffee shop and, as such, they have begun to sell some coffee products such as the Aeropress, filters and enamel coffee mugs. Their coffee shop is definitely on my list of places to go visit!

IMG_20160527_141341

Apart from the aforementioned notebooks, there is also Midori Traveler’s series and their range of brass products. Midori has some of the nicest looking (and simple) packaging and everything just seems so orderly when displayed.

My purchase was neatly packaged by the lady behind the desk in a brown envelope. The envelope has a custom stamp on it. Mine was of a polar standing on that was being drawn with a pencil. The envelope was sealed with a some fun paper tape of a man doing a roll.

IMG_20160527_141536

It was a pleasure to come by Plain Stationery & Homeware again and I’ll be stopping back whenever I have the chance. It’s small, but what it carries fits my interests very well. They’re always adding new products and there’s never a shortage of nice looking pics on their Facebook. I have to check out their Coffee Shop and, when I do, I’ll be sure to do a write up on that as well!